Parse made us to look for alternatives & Parse Open Server sounded like a good option. This almost ended up as a failure and we had to go curve road with Heroku.
Special thank you to our iOS Engineers Igor and Vitalii for their significant contributions to this post.
Well, we were using Parse for many years and had lots of apps (for both development and production) running on Parse. Each app uses Parse at 100%: database storage, file storage, custom Cloud Code, push notifications, app configurations, A/B testing and so on. On average, each of our apps has 4.5K lines of js/python server code.
Of course, we were somewhat frustrated after the Parse shutdown and began to look for a way out: maybe you read our ‘Life after Parse: what to do next’ post. Instead of thoroughly rewriting our backend or hosting on another MBaaS platform, we decide to migrate to Parse Open Server.
Why not Firebase or any other MBaaS? These services look promising, however using them means putting ourselves in a vendor lock-in again. Of course, there is also the added inconvenience of having to rewrite your cloud code and setup environment again.
So, the next stage of migration was deploying Parse Open Server on Heroku.
If you want to skip technical details about setting up a server on Heroku, you can go directly to Why We Broke Up With Heroku.
Why We Thought That Heroku Was Cool
The main idea is that you can migrate your app from Parse to Parse Server by using a free Heroku instance and deploying your database to mLab. Heroku is popular and it doesn’t look like a service that is going to shut down in the near future.
Heroku has a migration guide that looks quite easy, and lots of additional features you may need. Pricing plans look attractive too (at least, you can deploy dev environment on Heroku for free before moving your production code there).
Parse is shutting down on January 30, 2017 and you might need help migrating your apps. We can help with that, let’s talk!
Our plan
“It will be easy,” – we thought. “We have a plan,” – we thought.
Yes, we had a plan:
- Set up account on Heroku, migrate Parse settings.
- Migrate DB (to mLab).
- Migrate data to DB.
- Switch iOS app to the new server URL.
- Migrate Cloud Code and make it work (we will include more details about CC in next post).
- Migrate static html pages (like FAQ or ToS) and make them public.
- Migrate Cloud Jobs and schedule them.
- Set up Parse Dashboard.
- Handle hosting images on AWS S3 bucket.
- Integrate APNS.
We sorted items by priority (from most crucial to less) and started implementing them one-by-one.
Steps We Performed
1. Set up heroku toolbelt.
Heroku has a handy Getting Started tutorial, check it out.
2. Initialize the repo.
2.1 Put your cloud code to the separate repo. (If you don’t have one, you can download an example project using Parse server module on Express).
The idea behind this is to use repo with two remotes: your server (let’s say Github) and Heroku. Thus, your team can work with your own repo and push changes occasionally to the Heroku repo (aka ‘deploy server code’).
2.2 Log in to Heroku, using your credentials
$ heroku login
2.3 Add new remote repo, where ‘herokutest’ is the name of your repo.
$ heroku git:remote -a herokutest
And we will see what happens next:
$ git remote -v
heroku https://git.heroku.com/herokutest.git (fetch)
heroku https://git.heroku.com/herokutest.git (push)
origin https://yourgitserver/herokutest.git (fetch)
origin https://yourgitserver/herokutest.git (push)
Heroku uses your code only from the master branch and ignores others. So it’s safe to develop server code using git flow, and merge to master only tested changes.
2.4 Push changes:
$ git push heroku master
It’s boring to watch the whole deploy process in logs, but we’re waiting for ‘status up’, which means that the deployed code is running.
3. Import data
We use mLab for database storage.
The first thing to do is to create an account – read these guides if you haven’t got an mLab account yet:
– How to Migrate Your Parse App to Parse Server with Heroku and mLab
– Setting up Your Parse Server
Then it’s time to transfer data!
3.1 Manually
(warning: it shouldn’t be your first preference, I mean it!)
Export .zip archive with your data from Parse and change JSON structure a bit: remove root element “results” and change it to root element array.
From this json:
{
	"results": [{
		"field1": "value1",
		"field2": "value2"
	}]
}
To this:
[{
	"field1": "value1",
	"field2": "value2"
}]
Change keys from “objectId” to Mongo-style indexes named “_id”:
sed -e 's/\"objectId\":/\"_id\":/g' ./_Installation.json | jq . > _Installation_mapped.json
Then import every json entity (aka every table in your db) to mLab:
mongoimport -h <host>:<port> -d <database_name> -c <documentname> -u <username> -p <password> --file ./<file>.json --jsonArray
3.2 Using Migrate Button on Parse
The Parse team was so kind as to allow users to route all their data to alternative MongoDB installation. That’s called ‘Migrate to external database’. All you need is MongoDB installation with allowed external connections. Then you build the URL like this:
mongodb://<dbuser>:<dbpassword>@<host>:<port>/<database_name>
In case you are using mLab to host your data you can find this URL in your dashboard. It will look like this:
mongodb://<dbuser>:<dbpassword>@ds013320.mlab.com:13320/heroku_rfm7878d7
Then navigate to Open App Settings → App Management → Migrate in your Parse dashboard, add the link to your mLab database.
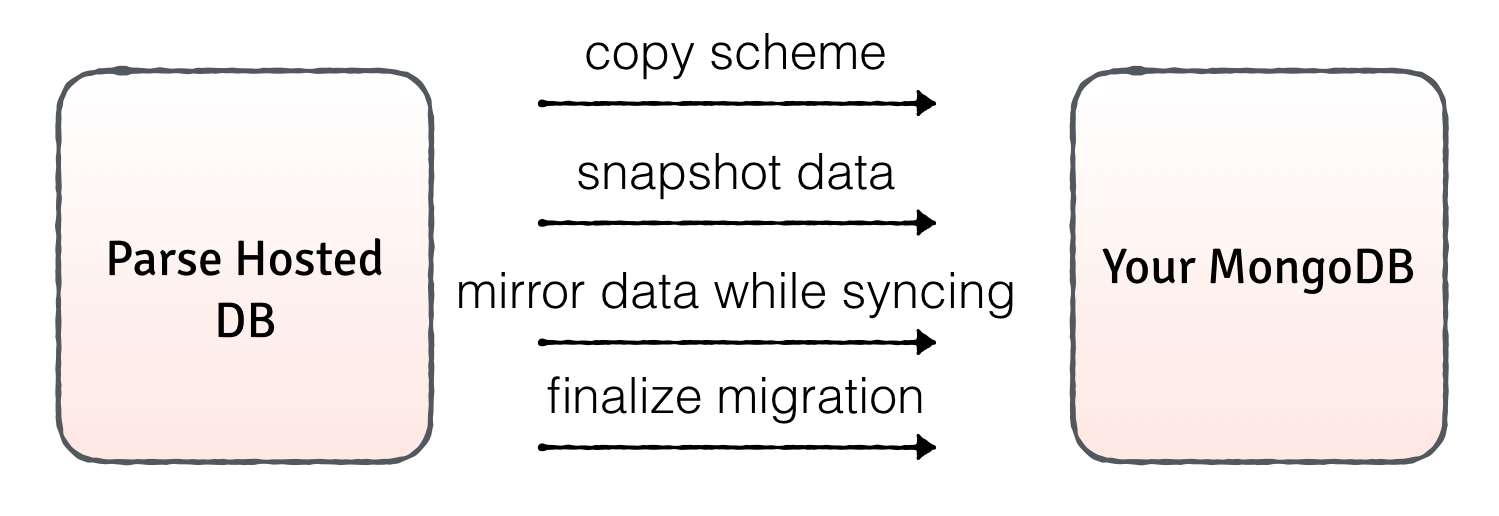
Migration has three steps:
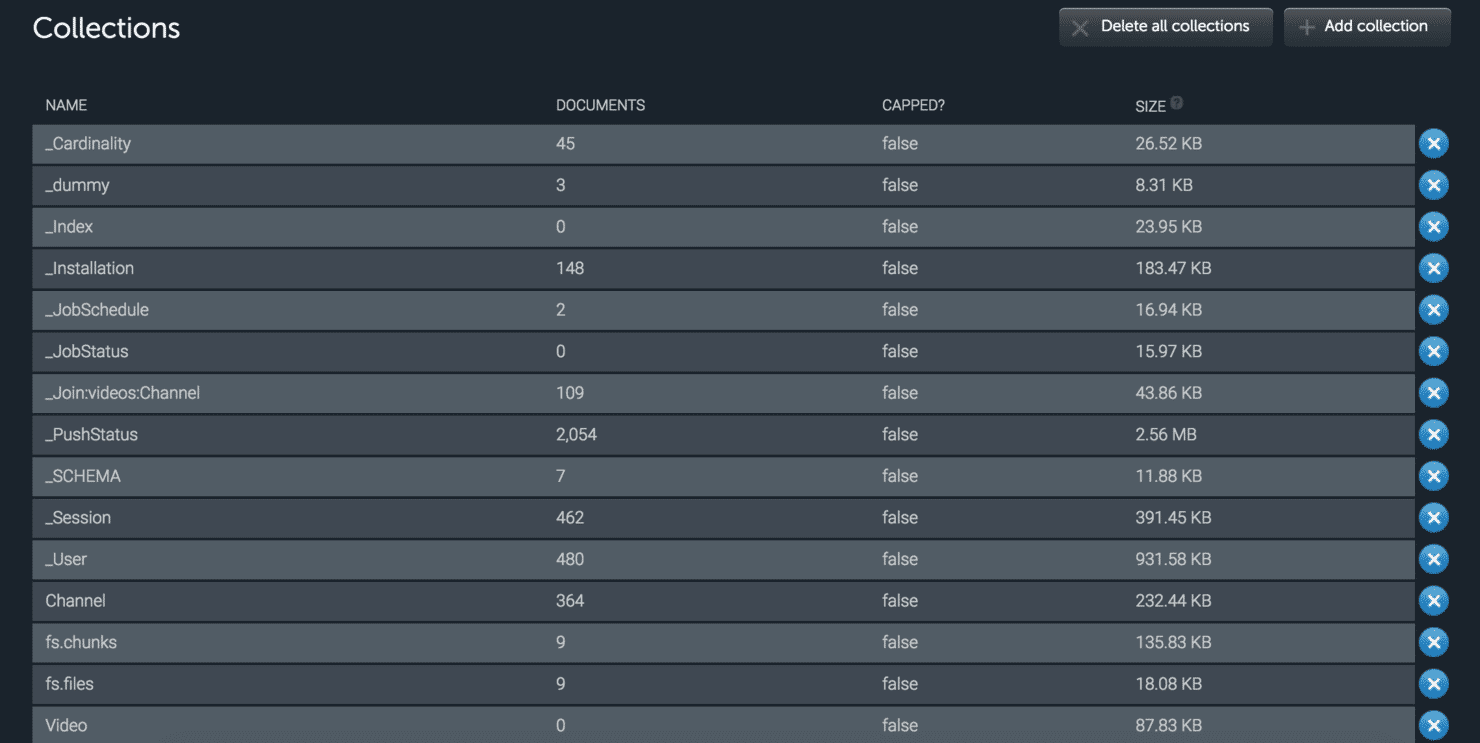
- Parse replicates your scheme to the remote MongoDB instance. This means it creates the same collections you had on Parse. This includes all service ones, so be prepared to see some unusual extra data you haven’t seen before in a data browser.
- Parse copies all the data from your parse DB to the remote one.
- Parse forwards all read/write calls to your external DB instead of to the old one hosted by Parse itself.
At the third step you can cancel migration – at this point you have full backup of your data, enjoy!
Please, read Parse Database Migration Guide carefully before trying to reproduce steps above.
One issue we encountered with migrating DB is that Parse won’t do anything unless your external DB is empty. That’s obvious, but what is more unexpected is that Parse starts to forward calls to the new DB before copying your data, between the first and second steps. So if you’re lucky enough to get some write calls during migration, it will fail, complaining that the external DB is not empty. If you look into your database after that, you’ll find all collections schemes replicated and some random data forwarded here from your backend. Just switch off your app before migration or stop your UI tests for a while 🙂
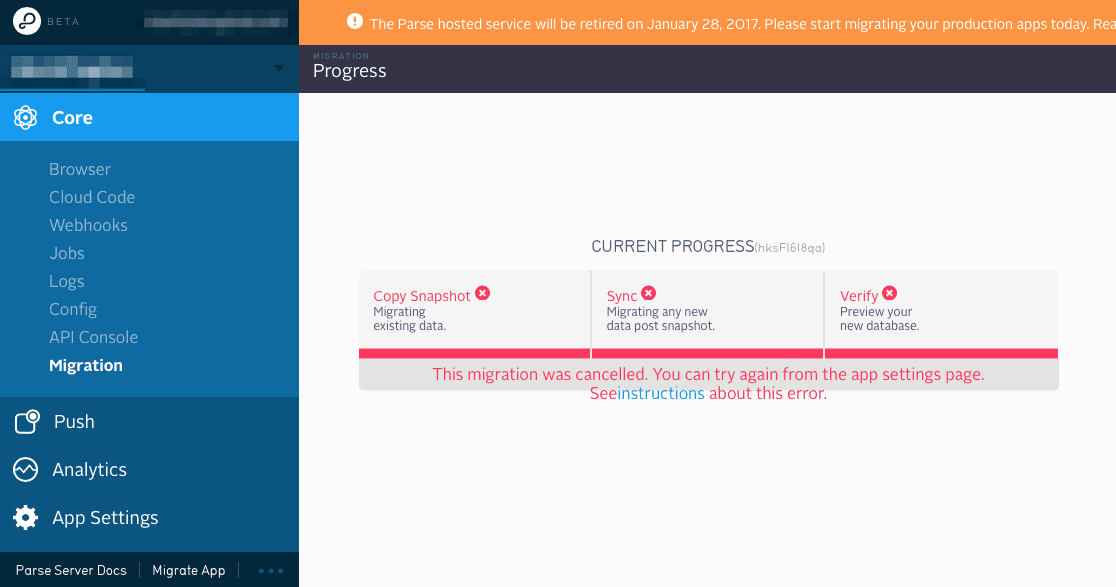
Press ‘Stop Migration’ when the first stripe becomes green. Menu Core now has ‘Migration’ item, but don’t be afraid, it’s okay.
To support keys that are longer than 1024 bytes, you should disable warning in mLab. This option is not available if you’re using SandBox plan.
Unfortunately, now we’re responsible for handling database scaling and indexing, which makes support of production backends an especially somber task.
4. Schedule Cloud jobs
No more cloud jobs. Forget about them.
However, you can run simple tasks using Heroku scheduler add-on. It runs script in one-off dyno and has lots of limitations.
Cloud job is not a real job anymore; it’s just a piece of js code that runs on Node. It means you should initiate Parse server before the job can access it:
var Parse = require('parse/node');
Parse.initialize(<your-repo-name>, <master-key>, <master-key>);
Parse.serverURL = 'http://<your-repo-name>.herokuapp.com/parse/';
Parse.Cloud.useMasterKey();
We use Heroku scheduler dashboard to run these ‘jobs’.
To test your job, run one-off dyno:
$ heroku run bash
And run your script manually:
$ node ./cloud/jobs/awesomeJob.js
Unfortunately, you need to quit and enter one-off node again – only then will it pull your changes.
The scheduler allows you to schedule tasks once a day, once an hour or every ten minutes. That’s all.
For more convenient timing, you should use clock command from procfile. You should write the configuration file, that allows you to describe more complicated schemes (like “run this job every 3 hours during working days and every hour during weekends”). We didn’t use it, but if you’re interested, read this java example.
The main caveat is that such scheduled tasks are running in the special background queue that uses one worker dyno. Having more than one worker dyno is beyond the limitations of the Free pricing plan.
And finally, this great quote from the docs:
There is no guarantee that jobs will execute at their scheduled time, or at all. Scheduler has a known issue whereby scheduled processes are occasionally skipped.
5. Set up APNS
Read the “Push Notification” section from Parse Server Guide carefully to get the main idea.
First, add APN credentials to the Parse Server init:
push: {
  android: {
    senderId: '', // The Sender ID of GCM
    apiKey: '' // The Server API Key of GCM
  },
  ios: {
    pfx: '', // The filename of private key and certificate in PFX or PKCS12 format from disk
    cert: '', // If not using the .p12 format, the path to the certificate PEM to load from disk
    key: '', // If not using the .p12 format, the path to the private key PEM to load from disk
    bundleId: '', // The bundle identifier associate with your app
    production: false // Specifies which environment to connect to: Production (if true) or Sandbox
  }
}
To use both production and dev push certificates, just add two items to the iOS array:
push: {
	ios: [{
		pfx: '', // Dev PFX or P12
		bundleId: '',
		production: false // Dev
	}, {
		pfx: '', // Prod PFX or P12
		bundleId: '',
		production: true // Prod
	}]
}
The second step is to add options parameter with useMasterKey enabled to the Parse.push.send() call:
Parse.Push.send({
	channels: [channel],
	data: data
}, { useMasterKey: true });
Switching between production and dev servers is described like this:
Parse Server’s strategy on choosing them is trying to match installations’ appIdentifier with bundleId first. If it can find some valid certificates, it will use those certificates to establish the connection to APNS and send notifications. If it cannot find, it will try to send the notifications with all certificates. Prod certificates first, then dev certificates.
6. Amazon S3
When you were using Parse, you didn’t consider where it stores file, right? PFFile is an excellent wrapper for all your photos or text files.
Now you need to handle file storage yourself. We prefer AWS S3, and it’s commonly used. We have registered the account there and are ready to create a bucket.
6.1 Configure bucket
Fortunately, configuring S3 bucket for Parse storage is quite easy: there’s a guide for that! Remember that bucket name shouldn’t contain dots.
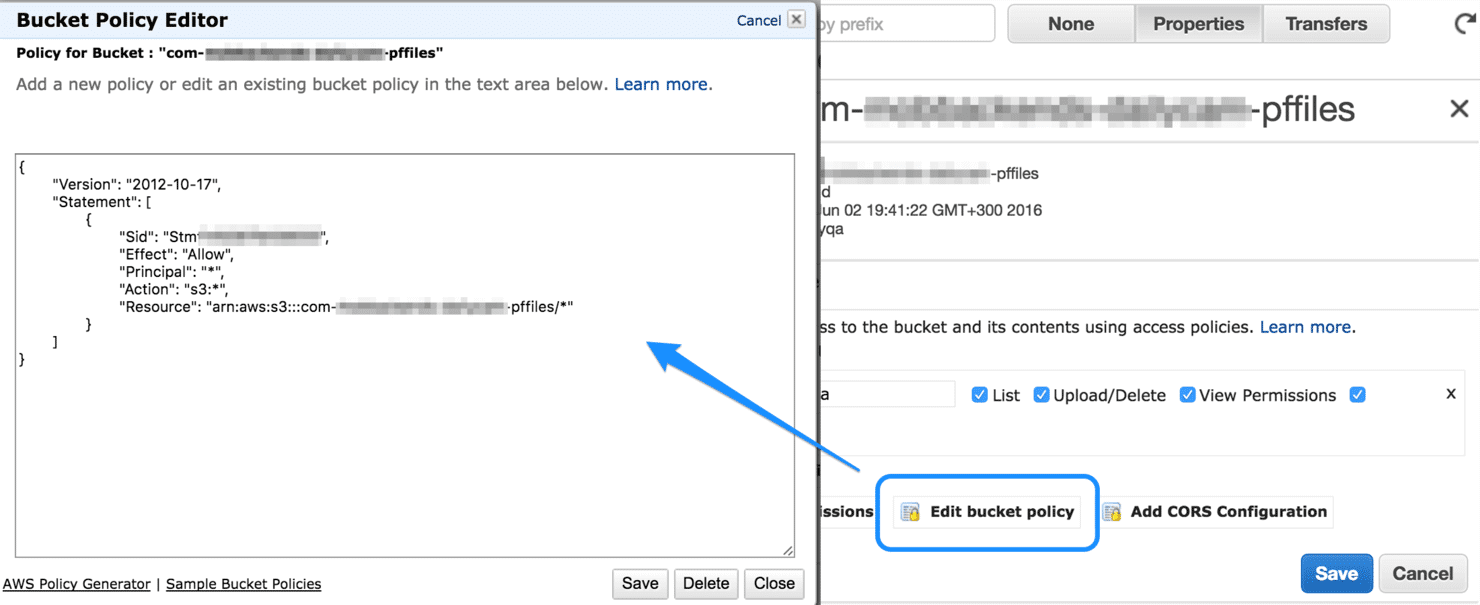
Make sure that after performing all steps described in the guide your policy looks similar to this:
{
	"Version": "2012-10-17",
	"Statement": [{
		"Sid": "Stmt145097236257572",
		"Effect": "Allow",
		"Principal": "*",
		"Action": "s3:*",
		"Resource": "arn:aws:s3:::<your-bucket-name>/*"
	}]
}
Now apply this policy to the bucket: select your bucket in S3 console, tap ‘Properties’ button in the top right corner. Expand ‘Permissions’ section, press ‘Edit bucket policy’ and paste json above in the text field.
6.2 Configure Parse Server
Now it’s time to configure Parse Server to make it save files to our bucket.
Configure S3 adapter:
var S3Adapter = require('parse-server').S3Adapter;
var s3Adapter = new S3Adapter(
    "AWS_KEY",
    "AWS_SECRET_KEY",
    "bucket-name",
    { directAccess: true }
);
and add two lines to the Parse Server init:
    filesAdapter: s3Adapter,
    fileKey: process.env.PARSE_FILE_KEY
7. Things to make your life easier
7.1 Setup vim
Install vim plugin like this:
$ heroku plugins:install https://github.com/naaman/heroku-vim
Then you can use heroku vim to open vim during the current session. The filesystem is virtual, so all your changes affect only the current dyno. It means that you can you vim for debugging only.
7.2 Restart your app
$ heroku restart -a <your-app-name>
7.3 Read the logs
Use following command:
$ heroku logs
Or add -t to read logs in interactive mode:
$ heroku logs -t
It’s much easier to read logs in the terminal than to read weblogs in the dashboard.
Why We Broke Up With Heroku
On the one hand, everything is okay: Heroku has a nice infrastructure, lots of migration tutorials and we got the app running in the end. But on the other hand, we have experienced a lot of difficulties during the migration process and were not able to create a workable flow for developing future apps. It’s not about the migration process itself, but more about how you feel in this ecosystem, how it suits your purposes and your development flow.
Deploy latency
Making sure that your code is working is important. Because the dev environment is set up on Heroku, the dev code needs to be deployed there too. It took us 20-30 seconds of waiting until the deployed code was running. It’s quite a long time, especially when you have to debug new feature.
A way of fixing this issue is to deploy and test code on your local infrastructure first. But this involves another drawback – the infrastructures differ.
Infrastructure peculiarities
The major advantage of Parse was that it handled everything, but now we need to use different service providers. For example, using mLab is great: they provide you the database and take care of scaling, upgrading, machine issues, etc. Unfortunately, mLab doesn’t compress your data, so your db takes ~10x more space than it took on Parse.
Unfortunately, the mLab free plan covers only 500MB of database storage. It means you will have to pay for the production apps, but maybe you will even need to pay for dev ones. The database that we migrated wasn’t very large, but neither was it small, because we didn’t care about cleaning up test data.
Now we need to clean up the database on a regular basis. Welcome, night-time jobs, that run and clean up the outdated rows.
Dev vs Prod: the difference in environment
Our main idea is to have dev and production environments as similar as possible. In terms of servers, it would mean that your software versions are the same (OS, mLab, Parse Server and other tools should be configured identically).
You can set up and run both Parse Server and MongoDB locally on your machine, but you can’t be sure that mLab uses the same MongoDB version as you (and won’t update it suddenly).
So we decided to use Heroku for both prod and dev apps.
That’s where the problems arose.
It’s not easy to write server code by several developers at the same time; you can’t just deploy your changes while testing without re-writing somebody else’s changes. Well, we experienced similar issues using Parse, but they have the Clone app button, allowing you to clone your current app and to play with it, before deploying your changes to the dev one.
Deploying on Heroku takes a lot of time and debugging is more about ‘reading logs’. Anyway, even to read the logs, you need to wait while weblogs update, or you can collect logs via ssh (and use one dyno for this).
Tricky pricing
At first glance, the free plan appears straightforward, but then you realize that your dyno needs to sleep for six hours a day, which means that requests that ‘awaken’ your dyno take longer than others.
Then you realize that there are different types of dyno, and worker dyno and ‘one-off’ dyno are completely separate entities.
Furthermore, if your account is not verified, you have another set of constraints to deal with.
Well, of course, sooner or later you understand how things are, but it really takes some time before you can answer the question “how much will we pay for the app after migration?”.
Parse is shutting down on January 30, 2017 and you might need help migrating your apps. We can help with that, let’s talk!
Summary
Migration is fun. At the end of the day you can read every post on the internet about Parse migration, but the proof of the pudding is in the eating.


